Search

Wednesday, April 10, 2013

What happened when query was submitted?

1. The SQL Server Network Interface (SNI) on the client established a connection to the SNI on the SQL Server using a network protocol such as TCP/IP. It then created a connection to a TDS endpoint over the TCP/IP connection and sent the SELECT statement to SQL Server as a TDS message.
2. The SNI on the SQL Server unpacked the TDS message, read the SELECT statement, and passed a “SQL Command” to the Command Parser.
3. The Command Parser checked the plan cache in the buffer pool for an existing, usable query plan. When it didn’t find one, it created a query tree based on the SELECT statement and passed it to the Optimizer to generate a query plan.
4. The Optimizer generated a “zero cost” or “trivial” plan in the pre-optimization phase because the statement was so simple. The query plan created was then passed to the Query Executor for execution.
5. At execution time, the Query Executor determined that data needed to be read to complete the query plan so it passed the request to the Access Methods in the Storage Engine via an OLE DB interface.
6. The Access Methods needed to read a page from the database to complete the request from the Query Executor and asked the Buffer Manager to provision the data page.
7. The Buffer Manager checked the data cache to see if it already had the page in cache. It wasn’t in cache so it pulled the page from disk, put it in cache, and passed it back to the Access Methods.
8. Finally, the Access Methods passed the result set back to the Relational Engine to send to the client.

Did you know… When we rename a domain group in Active Directory, we can have some issues related to the login in SQL Server

The Active Directory group we used to grant access to a snapshot publication does not show up in the Publication access list (PAL) anymore when viewing the properties of the publication. However, the AD group does show up in the MSPublication_Access table for the snapshot publication in the Distribution database.
There is a disparity between what the Replication property settings and what is actually in the MSPublication_Access table. When we try to add the group to the PAL in the GUI, it doesn't give any error message and completes. But when we again check the PAL, it doesn't show up.
 CAUSE
The login was changed in the AD sometime back. The change was that the login was renamed and not deleted and recreated afterwards. So the SID remained same for the changed login in the AD. But because of this change in the AD, SQL Server was never aware of the change of the name. The login with the old name still existed in the server and mapped to the same SID. Then somehow the login was deleted and recreated at the SQL Server level. So when the login was created again at the SQL Server, the new name was created on the SQL Server but the same Old SID was associated with it.
But the entry for the login remained there in the mspublication_access table. This login was never removed during the deletion of the login from the SQL Server. Afterwards whenever they used GUI to check the PAL, it was unable to find the login name from the SQL Server logins and hence didn't show up in the PAL GUI. But whenever they tried to add the login in the PAL, it was able to find an existing record with the same SID and hence failed to add the same. But it never gave any error message.

RESOLUTION
Delete the record manually from the MSPublication_Access table in distribution database. Then again add the login to the SQL Server and PAL.

The subscription fails to Sync with the Publisher and marked inactive even though the settings have been configured to “never expire”

Sometimes we get the below error message when distribution agent tries to sync,
Error: 14151, Severity: 18, State: 1.The subscription(s) have been marked inactive and must be reinitialized. NoSync subscriptions will need to be dropped and recreated.

CAUSE:
When we check the Publication properties, we find that the options for subscription expiration are marked as "Subscriptions never expire".
When we check the sql server error log, we see that the following error is reported in the error log,
Message in Errorlog :-
Replication-Replication Distribution Subsystem: agent Servername\Instname-Directory-Directory_R-Servername\Instname-8 scheduled for retry. Query timeout expiredError: 14151, Severity: 18, State: 1.Replication-Replication Distribution Subsystem: agent Servername\Instname-Directory-Directory_R-Servername\Instname-8 failed. The subscription(s) have been marked inactive and must be reinitialized. NoSync subscriptions will need to be dropped and recreated.Error: 14151, Severity: 18, State: 1.Replication-Replication Distribution Subsystem: agent Servername\Instname-Directory-Directory_R-Servername\Instname-8 failed. The subscription(s) have been marked inactive and must be reinitialized. NoSync subscriptions will need to be dropped and recreated.Error: 14151, Severity: 18, State: 1.Replication-Replication Distribution Subsystem: agent Servername\Instname-Directory-Directory_R-Servername\Instname-8 failed. The subscription(s) have been marked inactive and must be reinitialized. NoSync subscriptions will need to be dropped and recreated.
From the above error log it is clear that the Subscriber was deactivated due to some reason.
So in order to find the cause of deactivation we need to check the Transaction Retention period in the Distribution properties. If it is set to a lower number like 3 hours, then this indicates that if the subscriber does not synchronies in 3 hours, the distribution cleanup agent will truncate the commands tables in distribution and hence the subscriber will be marked as deactivated.Since the commands are deleted from distributor there is no other option but to reinitialize the subscriber.

****Also to find the cause of the Distributor not being able to sync we can check the Distribution history in the below tables on distribution database,
msdistribution_agents
msdistribution_history

Log Reader Agent Fails when the Sql server instance is failed over to Node 2

In some cases where we use sql server replication on a clustered instance of sql server and when we try to failover from Node 1 to Node 2 the Log Reader agent may fail to start with the following error
Error messages:
The process could not execute 'sp_MSpub_adjust_identity' on 'CRPSCSMSQ69V1\PUB'. (Source: MSSQL_REPL, Error number: MSSQL_REPL20011)
 An error occurred during decryption. (Source: MSSQLServer, Error number: 15466)
Get help: <<http://help/15466>>
The process could not execute 'sp_MSpub_adjust_identity' on 'CRPSCSMSQ69V1\PUB'. (Source: MSSQL_REPL, Error number: MSSQL_REPL22037)
As seen above the root cause of the issue is the error
“An error occurred during decryption”
Which mean when the sql server instance fails over to Node 2 it is not able to decrypt the stored procedure sp_MSpub_adjust_identity due to which it is not able to execute the stored procedure sp_MSpub_adjust_identity which in turn causes Log Reader Agent to fail on Node 2. It was not able to decrypt the stored procedure as the Service Master Key on Node 2 was different than the Service Master Key on Node 1.
The Service Master Key is the root of the SQL Server encryption hierarchy. It is generated automatically the first time it is needed to encrypt another key. By default, the Service Master Key is encrypted using the Windows data protection API and using the local machine key. The Service Master Key can only be opened by the Windows service account under which it was created or by a principal with access to both the service account name and its password. Regenerating or restoring the Service Master Key involves decrypting and re-encrypting the complete encryption hierarchy.
Service Master Key automatically encrypts all secure system data such as:
Database Master Keys
Linked Server passwords
Provider strings stored in sysservers
Credentials Secrets
So we can resolve the issue in following ways
Solution 1
One of the ways to resolve the above error is to backup the service master key from Node 1 and restore the same on Node 2
BACKUP SERVICE MASTER KEY TO FILE = 'path_to_file' ENCRYPTION BY PASSWORD = 'password' ---------------- (Use this command to backup the service master key on Node 1 )
RESTORE SERVICE MASTER KEY FROM FILE = 'path_to_file' --------------------------- (Use this command to restore the service master key on Node 2)
DECRYPTION BY PASSWORD = 'password' [FORCE]
Solution 2
Another solution is to regenerate the service master key on Node 2 with Force option using the following command
ALTER SERVICE MASTER KEY REGENERATE FORCE
This solution should be used with precaution because in this case when you fail back to Node 1 the Log Reader agent will fail again with the same error.
Again, when we regenerate the Service Master Key forcibly, the Linked servers on the server can fail as the password for the security logins cannot be decrypted and hence we may have to recreate the Linked servers or change the password for the Linked servers which can be tedious and undesirable.
Solution 3
The above issue occurs since the service account of the clustered instance of sql server was changed using the Windows services console (services.msc). For a clustered instance of the sql server we recommend changing the service account using the sql server configuration manager because it decrypts all the secure system data using the old service master key, generates a new service mastery key based on the new startup account and re-encrypt all the system data with the new service master key. It also checkpoints all the information in the quorum so that the changes gets replicated to Node 2 when the sql server instance is failed over to Node 2. Hence the above error does not occur when the sql server startup account is changed using sql server configuration manager. When we use sql server configuration manager to change the service account for sql server we are sure that the same account will be used as sql server startup account on all the nodes of the cluster.
So to resolve the above error we need to change the Service Account to another account using the Configuration Manager on Node 1 and try to failover on Node 2 and check whether the Log Reader Agent worked fine. We can then change the Service Account back to the original account using the Configuration manager and try to failover again and the replication should work fine.
We can refer to the following links to determine the what type of service accounts should be used and how to change the service account for Sql server instance in a cluster
Reference

SQL Server could not create a subscription for Subscriber 'Servername\InstanceName'.The value for the @sync_method parameter is not valid.

Creation of a Subscription was failing with the following error:-

TITLE: New Subscription Wizard   
SQL Server could not create a subscription for Subscriber 'Servername\InstanceName'.    
 
ADDITIONAL INFORMATION:
An exception occurred while executing a Transact-SQL statement or batch. (Microsoft.SqlServer.ConnectionInfo)    
   
The value for the @sync_method parameter is not valid. Could not subscribe to publication 'Publication_name' because non-SQL Server Subscriber 'Servername\InstanceName' only supports values of 'character', 'bcp character', 'concurrent_c', and 'database snapshot character' for the @sync_method parameter.
The subscription could not be found.
Changed database context to 'test'. (Microsoft SQL Server, Error: 14095)

Cause: The issue is due to an incorrect entry in system table (master..sysservers) due to which SQL thinks that current subscriber
is NON-SQL. Interestingly the entry for the current subscriber server in master..sysservers (on publisher server) was showing 1 for "nonsqlsub" column.
Solution:
First look at sys.servers and confirm whether the nonsqlsub column is set to 1 for the concerned subscriber. If the above is true then run the following TSQL to change nonsqlsub column from 1 to 0
exec sys.sp_serveroption 'Servername\InstanceName','nonsqlsub',False
Note – Please replace Servername\InstanceName with concerned subscriber\instancename. After this, re-attempt the creation of subscription and it should succeed this time.

References: Sys.servers :- http://msdn.microsoft.com/en-us/library/ms178530.aspx

Tuesday, April 9, 2013

Failure of SQL Server 2008 Installation due to MSI error

Issue:

Installation of SQL Server 2008 might fails with below error on 64-Bit Operating system.

MSI Error: 1719 The Windows Installer Service could not be accessed. This can occur if you are running Windows in safe mode, or if Windows Installer is not correctly installed. Contact your support personnel for assistance.

Resolution:
Delete HKEY_LOCAL_MACHINE\SYSTEM\CurrentControlSet\services\msiserver\WOW64

Run command: c:\windows\system32>misexec /regserver
Run command c:\widnows\syswow64>msiexec /regserver
Restart Windows Installer Service.

Root Cause:
HKEY_LOCAL_MACHINE\SYSTEM\CurrentControlSet\services\msiserver\WOW64 with REG_DWORD = 1 is used to make the installer run in 32 bit mode on 64 –Bit systems assuming windows is 32-bit. This is helpful in running installers that are not compatible with 64bit OS

However, most of the 32bit installers are compatible with 64bit OS and do not need this value to 1. When the value of WOW64 is set 0 it returns the actual OS architecture to the installer. If set to 1 then it returns OS architecture as 32-Bit making Windows Installer to run in 32-bit mode.

Error Messages and the Solutions Related to “distributor_admin” login

Error messages:

The log reader fails with the following error message:       

The process could not execute 'sp_MSpub_adjust_identity' on 'PR2K8\YUKON'. (Source: MSSQL_REPL, Error number: MSSQL_REPL20011)
Get help: http://help/MSSQL_REPL20011
Login failed for user 'distributor_admin'. (Source: MSSQLServer, Error number: 18456)
Get help: http://help/18456

Snapshot Agent may fail with this error:  

Could not retrieve agent status. (Login failed for user 'distributor_admin'. (.Net SqlClient Data Provider))

Distribution agent may fail with this error message:       

An error occurred while attempting to access the subscription. (View Synchronization Status)
------------------------------
An exception occurred while executing a Transact-SQL statement or batch. (Microsoft.SqlServer.Rmo)
------------------------------
Login failed for user 'distributor_admin'. (Microsoft SQL Server, Error: 18456)
------------------------------
For all the above error messages, the cause of the problem may be that the distributor_admin login password does not match with the password set on the distributor server.

Solution:       
If you know the password of distributor_admin login on the distributor server, then set the same password on the Publisher Server using stored procedure sp_changedistributor_password
If you don’t know the password for distributor_admin login on the Distributor Server then you need to follow the below steps:
1. On the distributor server, run SP sp_changedistributor_password with the new password that you would like to set.
Example: sp_changedistributor_password 'newpassword'
Or, you can also use the Distributor Properties window on the Distributor Server((Right click on the Replication folder and click Distributor Properties) to change the Distributor_Admin password as shown in the below figure:


2. On all the remote publisher server/s, run SP sp_changedistributor_password using the password specified in the first step.
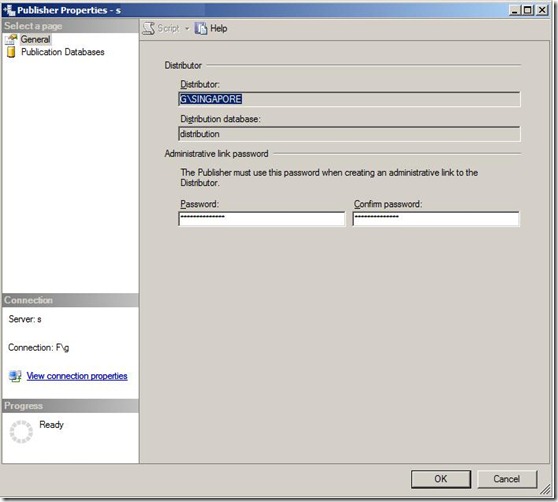
Or, you can also use the Publisher Properties window on the Publisher Server to change the distributor_admin password (Right click on the Replication folder and click Publisher Properties) as shown in the below figure:


Information about distributor_admin login in SQL Server and why it is needed in replication       
Distributor_admin is a SQL Server login account which is used by the repl_distributor linked server (remote server) in SQL Server replication. This login is created on the Distributor Server and the administrator specifies the password for the distributor_admin login (for the Remote Distributor Server). The same password is then needed at the remote publisher when distribution is configured from the remote publisher server. This helps in securing the Distributor Server so that none of the servers in the topology can use the Distributor Server for distribution purpose without specifying the distributor_admin password. Therefore, the distributor_admin password works as a key for the Publisher Server to enable itself to use the remote server as its distributor server.

What is Local and Remote distributor
local distributor - distribution database is present within publisher instance
remote distributor - distribution database is present on the remote SQL Server instance and not on the publisher instance
Configuring a Local Distributor :      
When you run the "Configure distribution" wizard on the Distributor Server for local distributor, the following gets created on the Distributor Server:
1. distributor_admin (SQL Server login account) is created on the SQL Server Distributor Server and the password is generated automatically.
2. Also, the linked server (remote server) named repl_distributor is created on the SQL Server Distributor Server which uses the distributor_admin login credentials for the remote server connections.

Configuring a Remote Distributor :      
Configuring a Remote Distributor is done in two steps:
A. When you run the "Configure distribution" wizard on the Distributor Server for remote distributor, you specify the remote publisher and the following gets created on the Distributor Server:
1. Distributor_admin (SQL Server login account) is created on the SQL Server Distributor Server and the password is specified by the Administrator.
2. Also, the linked server (remote server) named repl_distributor is created on the SQL Server Distributor Server which uses the distributor_admin login credentials for the remote server connections
B. You then go to the Publisher Server and run the “configure distribution” wizard and specify the distributor server along with the distributor_admin login password (same password that you specified in Step A-1).
The repl_distributor linked server is used for the following purposes:
1. Used by the replication stored procedures and functions that require processing on the publication database as well as the distribution database.For example: When you create the publication using wizard or using SP sp_addpublication an entry is made in syspublications table on the publication database and details about this publication are also inserted in the mspublications table in the distribution database.
This linked server is used regardless of local distributor or for the remote distributor
2. Used to fetch the information from the distribution database like replication agent status:
For example: Information about distribution agent and log reader agent status from msdistribution_history, mslogreader_history tables from the distribution database
Whenever you add the first remote publisher on the distributor server, the password for distributor_admin login is required. When you add the subsequent remote publisher on the Distributor server, the same password is used that was used for the first publisher.
Also, when you configure distribution from the remote publisher, distributor_admin password is required.

Please note that the login distributor_admin should never be deleted. To change the password for the distributor_admin login, always use the SP sp_changedistributor_password on the Distributor server as well as on the remote publisher server/s or use the above GUI screens.

Monday, April 8, 2013

Extended Support for SQL Server 2000 To End on Tuesday,9th April 2013.

SQL Server 2000 will lose its "extended support" from Microsoft on Tuesday, April 9,

The loss of extended support means no more security updates will be delivered to customers via Microsoft's update service. Remedies for organizations still using SQL Server 2000 are to upgrade the product (Microsoft is recommending moving to its current SQL Server 2012 product) or pay for "custom support" through Microsoft Premier Support services, according to a Microsoft announcement.

It's possible to continue to run SQL Server 2000 after April 9, but that approach isn't recommended by Microsoft for security reasons. Self-help resources, such as Knowledge Base articles and troubleshooting tools, will continue to be available online for a minimum of 12 months.

Upgrading from SQL Server 2000 to SQL Server 2005 maybe isn't such a good idea because that product already entered the extended support phase, which happened on April 12, 2011. Extended support for SQL Server 2005 will end on April 12, 2016, according to Microsoft's lifecycle page.

Support Lifecycle Index of All Microsoft Product

http://support.microsoft.com/gp/lifeselectindex

Support options for organizations still using the older products, such as SQL Server 2000 and SQL Server 2005, can be found here. Microsoft also has this general SQL Server support portal, which provides links to various resources.

Support for Microsoft SQL Server

http://support.microsoft.com/ph/1044


Friday, March 15, 2013

Rebuild Master Database in SQL 2000

To rebuild the master database
Shutdown Microsoft® SQL Server™ 2000, and then run Rebuildm.exe. This is located in the Program Files\Microsoft SQL Server\80\Tools\Binn directory.

In the Rebuild Master dialog box, click Browse.

In the Browse for Folder dialog box, select the \Data folder on the SQL Server 2000 compact disc or in the shared network directory from which SQL Server 2000 was installed, and then click OK.

Click Settings. In the Collation Settings dialog box, verify or change settings used for the master database and all other databases.
Initially, the default collation settings are shown, but these may not match the collation selected during setup. You can select the same settings used during setup or select new collation settings. When done, click OK.
In the Rebuild Master dialog box, click Rebuild to start the process.
The Rebuild Master utility reinstalls the master database.

To start a named instance of SQL Server in single-user mode from a command prompt

From a command prompt, enter:
sqlservr.exe -c - m -s {instancename}

To start the default instance of SQL Server in single-user mode from a command prompt
From a command prompt, enter:
sqlservr.exe -c -m

Note  You must switch to the appropriate directory (for the instance of Microsoft® SQL Server™ you want to start) in the command window before starting sqlservr.exe.

To start the default instance of SQL Server from a command prompt

From a command prompt, enter:
sqlservr.exe -c

Note  You must switch to the appropriate directory (for the instance of Microsoft® SQL Server™ you want to start) in the command window before starting sqlservr.exe.

 start the default instance of SQL Server with minimal configuration

From a command prompt, enter the following command to start the default instance of Microsoft® SQL Server™ as a service:
sqlservr -c -f

Note  You must switch to the appropriate directory (for the instance of SQL Server you want to start) in the command window before starting sqlservr.exe.

To start a named instance of SQL Server with minimal configuration

From a command prompt, enter the following command to start a named instance of Microsoft® SQL Server™ 2000 as a service:
sqlservr -c -f -s {instancename}

Note  You must switch to the appropriate directory (for the instance of SQL Server you want to start) in the command window before starting sqlservr.exe.


How to Downgrade a Database from SQL Server 2005 to SQL Server 2000

Step 1 Generating Scripts for the Database Elements and Structures


1)Right-click over the desired Database at 2005, Choose Tasks and the Generate Scripts (Option).
2)At the pop-up Dialog Box click at the Script All Objects in the selected Databases check box, to activate it and then Click the Next Button.
3)Set the following Elements to the following Values
a.Script Collation , set to TRUE
b.Script Database Create, set to TRUE
c.Script of SQL Version, set to SQL SERVER 2000
d.Script foreign keys, set to FALSE
e.Script Triggers, set to FALSE
Then Hit the Next button
4) Select the way the generated scripts should be saved (There are different selections. The most common one is Clipboard). Finally click the Next button till you reach the end.
5)Click Finish

After completing this procedure, we have to move to the SQL SERVER 2000 environment. Here, by using the Query Analyzer, we will have to run the scripts that were generated using the master database. Copy and Paste the script at the Query Analyzer and run it. After that the Structure of the Database will be created.

Be careful, the SQL Server 2005 Edition inserts the Views in a random place through the script. Therefore, all the scripts that are referred to the Views MUST be moved to the end of the script. If the Query Analyzer shows some errors do not be bothered. Delete all the elements created from the script and after you fix the code run it again.

Step2 Moving the data from 2005 to 2000

1)After completing the previous step successfully, moving the data follows. Right-click at the 2005 database you used to run the previous step and select Tasks and then choose the Export Data (option).
2)From the pop-up Dialog Box, select the Source Db and Click at the Next Button.
3)At the next step you will have to choose the destination server and the destination Database for the Data to be exported. Then Click Next.
4) A List of all the Source Database’s Elements will appear in the screen. Select one by one all the Elements you wish to move and for each one click at the button Edit Mappings (Located at the bottom right corner of the Dialog Box just under the Elements list). A new Dialog box will pop-up. Select the Delete rows in Destination Tables option and activate the Enable Identity Insert Option. (Remember to repeat this action for each of the selected Element from the list that will be moved.

CAUTION!!! A malfunction of the SQL Server 2005 has been found. Not sure why, after multiple tries I have observed that when I tried to move more than twelve Elements at once, the Export Data Wizard of SQL Server 2005 seemed to disable the Enable Identity Insert Option that was activated over the Edit Mappings Dialog Box. But if the number of the selected Elements is smaller than 12 no problem seemed to appear.

Step 3 Generating Scripts for the Database Foreign Keys and Triggers

Finally, to successfully finish the downgrade of the Database, the Triggers and the Foreign Keys of the DB must be produced. The procedure that should be followed is the one stated next:

1)Right-Click at the SQL 2005 Database and Select from Tasks Menu the Generate Scripts Option.
2)Using the pop-up Dialog Box make sure that the check box Script All Objects in the selected Databases is not enabled and hit the Next Button.
3)Set all the Elements on the List to a False Value except the ones that follow:
a.Include IF NOT EXISTS , set to TRUE
b.Script Owner, set to TRUE
c.Script of SQL Version, set to SQL SERVER 2000
d.Script foreign keys, set to TRUE
e.Script Triggers, set to TRUE

Then Hit the Next button
4)After finishing reading the Elements of the Database, a new list will appear at the Dialog Box. Make sure that you select ONLY THE TABLES of the Database and hit the Next Button.
5)At the screen that follows hit the Select All button and the Next.
6)Select the way the generated scripts should be saved (There are different selections. The most common one is Clipboard). Finally click the Next button till you reach the end.
7)Click Finish Button.

After completing this procedure, we have to move to the SQL SERVER 2000 environment. Here, by using the Query Analyzer, we will have to run the scripts that were generated using the master database. Copy and Paste the script at the Query Analyzer and run it. After that the Foreign Keys and the Triggers of the Database will be created.

After these steps the database should be fully functional under the SQL Server 2000 edition.

Thursday, March 7, 2013

Database Trace :- 3226


1. Successful backup entries are not added to the SQL Server error logs.
2. Entries are prohibited from being logged in the System event log.
3. Only failed backup event entries are logged.
4. No successful backup entries are logged.

A trace flag (3226) can be either specific to a session or a global trace flag.

A trace flag can be switched on or off by using the dbcc traceon and dbcc traceoff command

DBCC TRACEON(3226)
DBCC TRACEOFF(3226)

The .TUF & .WRK files in Log Shipping

.TUF File

.TUF file is the Transaction Undo File, which is created when performing log shipping to a server in Standby mode.
 When the database is in Standby mode the database recovery is done when the log is restored; and this mode also creates a file on destination server with .TUF extension which is the transaction undo file.

This file contains information on all the modifications performed at the time backup is taken.

The file plays a important role in Standby mode… the reason being very obvious while restoring the log backup all uncommited transactions are recorded to the undo file with only commited transactions written to disk which enables the users to read the database. So when we restore next transaction log backup; SQL server will fetch all the uncommited transactions from undo file and check with the new transaction log backup whether commited or not.

If found to be commited the transactions will be written to disk else it will be stored in undo file until it gets commited or rolledback.

.WRK File

The .wrk files are produced when the transaction log backups are copied from the backup location to the secondary server (by the agent job on the secondary).  The files are named .wrk during the copy operation; when they have been completely copied they are renamed to have the .trn extension.  The temporary naming using the .wrk extension ensures that the files are not picked up by the restore job until successfully copied.

So, if the .wrk file you are seeing is there all the time it is likely to be an old copy that failed for some reason.  So for normal operation, you'll see a .wrk file when each transaction log backup file is copied and then that will be renamed to a .trn file.
 

Monday, March 4, 2013

How To Remove Services Form Windows

Method 1 - manually delete registry entries

Windows services are registered under the following registry key.

HKEY_LOCAL_MACHINE\SYSTEM\CurrentControlSet\Services
Search for the sub-key with the service name under referred key and delete it.

Method 2: Remove services through Command Line

C:\windows\system32> sc delete < SERVICE name>

Wednesday, February 27, 2013

Error: Server Principal Already Exist

Sometimes you will face error like: Server Principal already exist while creating a Login.

1.Run the below query

SELECT SUSER_SID('dev')
GO

2.it will give an hexadecimal number like:

0x06EB61AB7AF713448F09FA5103282D43

3.Execute the following query
Select * from sys.server_principals where SID=0x06EB61AB7AF713448F09FA5103282D43

It wil give an out put like:

dev1 266 0x06EB61AB7AF713448F09FA5103282D43 S SQL_LOGIN 0 2012-10-17 18:02:05.353 2012-10-17 18:47:58.287 master us_english NULL

Remove the login "dev1: and corresponding database users and recreate the login "dev" once again

To find all logins in SQL Server that have been denied access

select  name, denylogin from sys.syslogins where denylogin ='1'

To find all logins that have been disabled in SQL 2005/2008/2008R2

select name,* from sys.server_principals where is_disabled = '1'

FInd Current Isolation Level

dbcc useroptions

Kill Negative SPID

1. Find the negative SPID number.

2. For e.g. is SPID number is -2 then run the below T-SQL
use master
go
select req_transactionUOW from syslockinfo where req_spid = -2
go
3. You will get a hexadecimal value with the above syntax and then run the below command.

KILL 'FE4A57F2-28C5-44F9-8416-B08760DFE7E9'

By this process you will be able to kill negative SPID.

Syntax to create Database Snapshot using T-SQL

Syntax to create Database Snapshot using T-SQL

Syntax :-

create database SnapshotName  on ( Name = Logical file name of DB , filename = 'C:\snapshotname.ss' ) as snapshot of Database name

Example :-

create database  test_snapshot on ( Name = test_new , filename = 'C:\test_new_snapshot.ss' ) as snapshot of test_new