Search

Tuesday, June 12, 2012

Moving all SQL Server 2005, SQL Server 2008 or SQL Server 2008R2 System Databases

Once you have reviewed the below KB articles , you can follow these steps to move all system databases at once.

http://msdn.microsoft.com/en-us/library/ms345408(v=SQL.105).aspx
http://support.microsoft.com/kb/224071
  1. Update the -d and -l startup parameters for SQL Server for the new location of the master data and log file
  2. Issue ALTER DATABASE commands to change the file location for the model, msdb and tempdb database files
  3. Stop SQL Server
  4. Move the MDF and LDF files to the new locations specified in steps 1 and 2 for the master, model and msdb databases
  5. Start SQL Server
  6. Delete the old tempdb files
In addition to the master, model, msdb and tempdb databases SQL Server 2005 introduces the mssqlsystemresource database. Microsoft recommends not moving this database, but if you do want to move this database as well you will follow these steps. Note you cannot move the mssqlsystemresource database for SQL Server 2008 or SQL Server 2008R2.
  1. Update the -d and -l registry startup parameters for SQL Server for the new location of the master data and log file
  2. Issue ALTER DATABASE commands to change the file location for the model, msdb and tempdb database files
  3. Stop SQL Server
  4. Move the MDF and LDF files to the new locations specified in steps 1 and 2 for the master, model and msdb databases
  5. Put SQL Server in minimal configuration mode by adding these two startup parameters -f and -T3608 and then start SQL Server
  6. Issue ALTER DATABASE commands for the mssqlsystemresource MDF and LDF files using same path as the master database
  7. Move the MDF and LDF files to the location specified in step 6 for the mssqlsystemresource database
  8. Stop SQL Server
  9. Remove the startup options added in step 5
  10. Start SQL Server
  11. Delete the old tempdb files
Moving all SQL Server 2000 System Databases

Once you have reviewed the KB articles above, you can follow these steps to move all system databases at once.
  1. Update the -d and -l startup parameters for SQL Server for the new location of the master data and log file
  2. Issue ALTER DATABASE commands to change the file location for the tempdb database files
  3. Stop SQL Server
  4. Move the MDF and LDF files to the new location specified in steps 1 for the master database
  5. Put SQL Server in single user mode by adding these three startup parameters -c, -m and -T3608 and then start SQL Server
  6. Detach the msdb and model databases
  7. Move the MDF and LDF files to the new location for the model and msdb databases
  8. Attach the model database from its new location
  9. Stop SQL Server
  10. Remove the startup options added in step 5
  11. Start SQL Server
  12. Attach the msdb database
  13. Delete the old tempdb files

SQL Server Dedicated Administrator Connection (DAC) !!

According to BOL “DAC allows an administrator to access a running instance of SQL Server Database Engine to troubleshoot problems on the server—even when the server is unresponsive to other client connections.” It is available through the sqlcmd utility as well as SSMS (SQL Server Management Studio). This feature is available from SQL Server 2005 onwards. This diagnostic connection allows an administrator to access SQL Server to execute diagnostic queries and troubleshoot problems even when SQL Server is not responding to standard connection requests. The connection is only allowed from a client running on the server. No network connections are permitted.
To use SQL Server Management Studio with the DAC, connect to an instance of the SQL Server Database Engine with Query Editor by typing ADMIN: before the server name.
Important Note: Object Explorer cannot connect using the DAC.
When we try to connect to Object Explorer using DAC, we will get the following error message:
Many people make the mistake of connecting Object Explorer using DAC.
I will show the steps to connect to a server using DAC through SSMS:
  1. Open SQL Server Management Studio (SSMS).
  2. Make sure there are no active DAC connection for the particular instance else new request to connect through the DAC is denied with error 17810.
  3. Click on “File” Menu, expand “New” and select “Database Engine Query”.
Type your ServerName along with Admin: as shown below
Ex: Admin:SUBHROServer
Give the credentials which have SYSADMIN privileges and then click Connect.
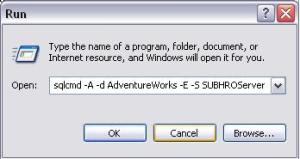
Using SQLCMD: Open run and type the below command:
sqlcmd -A -d AdventureWorks -E -S SQLServer
-A represents DAC or Admin
-d represents Database Name
-E represents Integrated Security
-S represents Server Name
You need to use an account which has SysAdmin privilege

When SQL Server Instance Started ?

Three ways to determine the start time of SQL Server Instance are as follows:
  1. By using sys.dm_os_sys_info DMV
  2. By “Date Created” of tempdb database
  3. By “login_time” of spid 1 from sys.sysprocesses
Very often I use sys.dm_os_sys_info to gather the data about the underlying system, but here I am not going into the details. I am going to show the ways to determine the start time of the Instance.
SELECT cpu_count,physical_memory_in_bytes,sqlserver_start_time FROM SYS.DM_OS_SYS_INFO

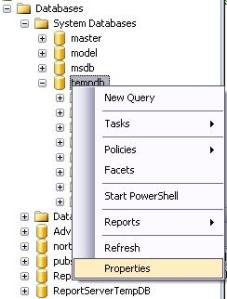
Second way you can see the start time of the Instance is by right clicking tempdb database and then Properties.
After selecting Properties you can see the Date Created of Tempdb which should be pretty close to the result we got above from the DMV.
Third way we can determine the same is by looking at the login_time of spid 1 from sys.sysprocesses. We will use the following query:
SELECT spid,login_time FROM sys.sysprocesses
WHERE spid=1
So we got the results from the three ways and the timings are pretty close to each other. I generally prefer the details from sys.dm_os_sys_info DMV.

SQL Server: When Statistics Last Updated ?

SELECT obj.name, idx.name AS [Index Name],
STATS_DATE(idx.[object_id], idx.index_id) AS [Statistics Date],
s.auto_created, s.no_recompute, s.user_created, part.row_count
FROM sys.objects AS obj WITH (NOLOCK)
INNER JOIN sys.indexes AS idx WITH (NOLOCK)
ON obj.[object_id] = idx.[object_id]
INNER JOIN sys.stats AS s WITH (NOLOCK)
ON idx.[object_id] = s.[object_id]
AND idx.index_id = s.stats_id
INNER JOIN sys.dm_db_partition_stats AS part WITH (NOLOCK)
ON obj.[object_id] = part.[object_id]
WHERE obj.[type] = ‘U’
ORDER BY STATS_DATE(idx.[object_id], idx.index_id) ASC;

SQL Server TempDB is Full !! Moving TempDB files to another drive..

Many times we get the following error in log files:
Description: The LOG FILE FOR DATABASE 'tempdb' IS FULL.
Back up the TRANSACTION LOG FOR the DATABASE TO free
up SOME LOG SPACE

I always follow the following conventions regarding log files:
  1. I always make sure that TempDB is set to autogrow.
  2. There is no maximum size limit for the TempDB.
Although we should always set the Initial size of the TempDB carefully because we do not want the TempDB to automatically add chunks frequently as it will adversely affect the performance of the database.
Now in case the current drive does not have the capacity to meet the space requirement of the TempDB database, then we can add more space to the drive or we can move the TempDB files to different drives which has the capacity to meet the space requirement.
Today I will show how we can move the files of the TempDB database to different drives.
At first lets see the current location of the TempDB files and see the other properties of the Files:
USE tempdb
sp_helpfile
I can see that TempDB files are in the E:\ drive. I will move these files in F:\TempDB\ folder. Lets first confirm the new location where we want to place these files.
I will use the following command to verify the new location:
xp_cmdshelldir f:\tempdb
Till now everything looks good to move the files to the new location. We cannot change the location of the files through SSMS. We have run the following statement:
ALTER DATABASE tempdb
MODIFY FILE(NAME=tempdev, FILENAME=‘F:\Tempdb\tempdb.mdf’);
GO
ALTER DATABASE tempdb
MODIFY FILE(NAME=templog, FILENAME=‘F:\Tempdb\templog.ldf’);
GO
It will show us the following message:
So we can see the message that the new path will be used upon restarting the database. So we need to restart the server in order to use the new location for the TempDB database.
After restarting the server, lets check the location of the files of TempDB:
sp_helpfile
So we can see that we have successfully changed the location of the files.

SQL Server: Moving Tables to Different Filegroups !!

We can move the tables which have Clustered Indexes to another filegroups very easily. And if you want to move a table that does not have any Clustered Indexes then please create one on the table and then move ( ideally we should have Clustered Indexes on every table for performance gains).
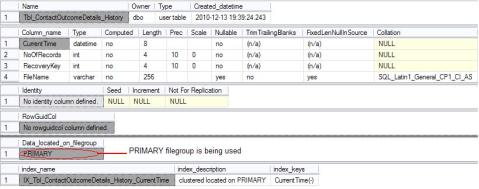
Lets first check the properties of the table that has Clustered Indexes:
I am showing this blog with ‘[dbo].[Tbl_ContactOutcomeDetails_History]‘ table in one of my sample database.

sp_help ‘[dbo].[Tbl_ContactOutcomeDetails_History]‘As


As you can see that currently the table is on PRIMARY filegroup. Now we will Move this table to SECONDARY filegroup. We will use the Clustered Index called “IX_Tbl_ContactOutcomeDetails_History_CurrentTime” to move this table to SECONDARY filegroup.
This is the following syntax to move the table along with its Clustered Index to SECONDARY filegroup:
USE [AdventureWorks]
GO
CREATE CLUSTERED INDEX [IX_Tbl_ContactOutcomeDetails_History_CurrentTime] ON [dbo].[Tbl_ContactOutcomeDetails_History]
(
[CurrentTime] DESC
)WITH (PAD_INDEX = OFF, STATISTICS_NORECOMPUTE = OFF, SORT_IN_TEMPDB = OFF, IGNORE_DUP_KEY = OFF, DROP_EXISTING = ON, ONLINE = OFF, ALLOW_ROW_LOCKS = ON, ALLOW_PAGE_LOCKS = ON) ON [Secondary]
GO
After this query is successfully executed, let’s check the properties of the Table again:
sp_help ‘[dbo].[Tbl_ContactOutcomeDetails_History]‘

So you can see that we have moved the table from PRIMARY filegroup to SECONDARY filegroup with single command which was not too difficult.

SQL Server 2005 & 2008: Find Database States !!

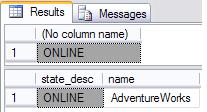
We can easily find the database states in SQL Server 2005 and above by using sys.databases and DATABASEPROPERTYEX. To know about the current database states..we can use the following queries:
SELECT DATABASEPROPERTYEX(‘AdventureWorks’,‘STATUS’)
SELECT state_desc,name
FROM sys.databases
WHERE name=‘AdventureWorks’
The following can be the different Database States:
  1. ONLINE: Database is available for access.
  2. OFFLINE: Database is unavailable.
  3. RESTORING: One or more files of the primary filegroup are being restored, or one or more secondary files are being restored offline. The database is unavailable.
  4. RECOVERING: Database is being recovered.
  5. RECOVERY PENDING: SQL Server has encountered a resource-related error during recovery.
  6. SUSPECT: At least the primary filegroup is suspect and may be damaged.
  7. EMERGENCY: User has changed the database and set the status to EMERGENCY.
Reference:MSDN

SQL Server: Database Snapshots !!

A database snapshot is a read-only, static view of a database (the source database). Multiple snapshots can exist on a source database and always reside on the same server instance as the database. Each database snapshot is transactionally consistent with the source database as of the moment of the snapshot’s creation. A snapshot persists until it is explicitly dropped by the database owner.
Snapshot database operates at page level. When Snapshot database is created, it is produced on sparse files, it does not occupy any space in the Operating System. When any data page is modified in the source database, that data page is first copied to Snapshot database, making the sparse file size increases. For unchanged pages, it still fetches the data from the actual database.
Lets see how database snapshot works by a practical example. Let us first create the source database to prepare environment.
CREATE DATABASE Test
USE Test
GO
CREATE TABLE Test_Table(ID INT,Name VARCHAR(15))
GO
INSERT INTO Test_Table VALUES
(1,‘A’),
(2,‘B’),
(3,‘C’)
Select * from Test_Table
So we have the table and all the records inserted in it. Lets first look at the size of the database that we created above.
EXEC sp_spaceused
Lets also look at the physical file size of the .mdf file.
Lets create the SNAPSHOT of the database:
USE master
CREATE DATABASE TEST_SS
ON
(NAME=TEST,
FILENAME=‘C:\Subhro\TEST_SS.ss’
)
AS SNAPSHOT OF TEST
The above statement creates a snapshot which can be found here:
Lets check the size of the snapshot:
USE TEST_SS
GO
EXEC sp_spaceused
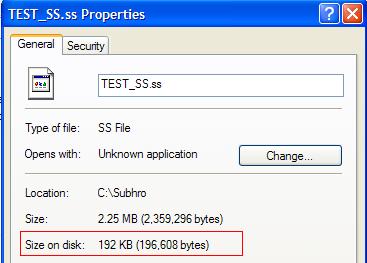
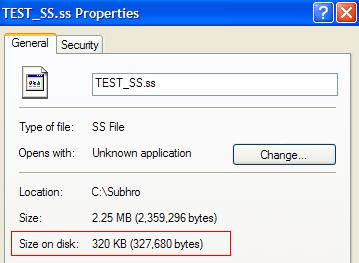
The space used details shown above are of the “Test” database which the snapshot is pointing to, and to confirm the observation, if we go to C:\Subhro\TEST_SS.ss and right-click for Properties, we will see what is shown below. The actual size occupied by the snapshot is merely a 192 KB.
Lets insert few records in the source database Table:
USE Test
GO
INSERT INTO Test_Table VALUES
(4,‘D’),
(5,‘E’),
(6,‘F’)
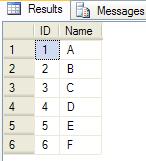
Select * from Test_Table
Lets check the records from the Snapshot:
USE TEST_SS
GO
Select * from Test_Table
Lets take a look at the physical size of the Snapshot File again:
We observe that the size of the snapshot has increased; this is because of the page being copied to the snapshot. The page holding the Test table’s three records got copied into the snapshot when we added additional records into it.
This was all about database Snapshot. One final test, let’s try to restore the database from Database Snapshot:
USE master
RESTORE DATABASE TEST
FROM DATABASE_SNAPSHOT = ‘TEST_SS’
Finally, lets again check the records in the Test_table:
select * from test_table
So we can see that all the records that were inserted after creating the snapshot have been rolled back when we restored the database from Snapshot.

SQL Server 2000: TempDB Disk is Full !!

As it was SQL Server 2000 instance so the available options to us is little limited. So at first I wanted to SHRINK the log file that was around 98% FULL. I used the following command:
USE tempdb
GO
DBCC SHRINKFILE (‘templog’, 1024)
The command ran successfully. But there was no change in database size.
So then my next step was to find any uncommitted transactions, which is not letting me to shrink the log.. for that I use the following command:
DBCC OPENTRAN (‘tempdb’)
There was one SPID that was running for last two days. Now I had to see what that SPID is doing. For that, I used the following query:
DBCC INPUTBUFFER (SPID)
It was a SELECT query that was running for last 2 days. It was using SORT operation on the result set. By that time TempDB log was around 99% full.
I used the following command to KILL the culprit SPID:
KILL
After this, again I tried to SHRINK the database log file with the following command:
DBCC SHRINKFILE (‘templog’, 1024)
Bang. It was done. Now the log file was around 2% full.
This is a solution for emergency situations. For long-term solution, try to use the Proper file sizes and add log files if needed. Please create right indexes on tables.

SQL Server Deadlock Priority Configuration


The DEADLOCK_PRIORITY option dictates how the spids are handled when a deadlock occurs. The default deadlock priority in SQL Server 2000 and 2005 is NORMAL. SQL Server 2000 has two other settings of LOW and HIGH, whereas SQL Server 2005 has 21 settings based on a numeric priority. With this being said, SQL Server scans for deadlocks on a regular basis (i.e. every 5 seconds in SQL Server 2005) and the following logic is used to determine the victim of a deadlock:

  1. If the DEADLOCK_PRIORITY for one of the spids is lower than the other, the lower priority spid is chosen as the victim
  2. If the DEADLOCK_PRIORITY is the same for each spid involved, the spid that is less expensive/costly to rollback is chosen as the victim.

During this scanning process is where the DEADLOCK_PRIORITY comes in handy. This configuration is set at run time, not at parse time. So once you have done the analysis for your application you will know which portions of code will either succeed or fail based on the DEADLOCK_PRIORITY. Below is an example of setting the DEADLOCK_PRIORITY in SQL Server 2005 for two different pieces of code to ensure you are able to control the outcome of the deadlock by ensuring the INSERT completes and the SELECT is the deadlock victim:

SET DEADLOCK_PRIORITY LOW
GO
EXEC dbo.spGetAllOrders
GO
SET DEADLOCK_PRIORITY HIGH
GO
EXEC dbo.spInsertOrders
GO


   Syntax:      


SET DEADLOCK_PRIORITY { LOW | NORMAL | HIGH | | @deadlock_var | @deadlock_intvar }


::= { -10 | -9 | -8 | … | 0 | … | 8 | 9 | 10 }


Arguments:

LOW

Specifies that the current session will be the deadlock victim if it is involved in a deadlock and other sessions involved in the deadlock chain have deadlock priority set to either NORMAL or HIGH or to an integer value greater than -5. The current session will not be the deadlock victim if the other sessions have deadlock priority set to an integer value less than -5. It also specifies that the current session is eligible to be the deadlock victim if another session has set deadlock priority set to LOW or to an integer value equal to -5.

NORMAL

Specifies that the current session will be the deadlock victim if other sessions involved in the deadlock chain have deadlock priority set to HIGH or to an integer value greater than 0, but will not be the deadlock victim if the other sessions have deadlock priority set to LOW or to an integer value less than 0. It also specifies that the current session is eligible to be the deadlock victim if another other session has set deadlock priority to NORMAL or to an integer value equal to 0. NORMAL is the default priority.

HIGH

Specifies that the current session will be the deadlock victim if other sessions involved in the deadlock chain have deadlock priority set to an integer value greater than 5, or is eligible to be the deadlock victim if another session has also set deadlock priority to HIGH or to an integer value equal to 5.


Is an integer value range (-10 to 10) to provide 21 levels of deadlock priority. It specifies that the current session will be the deadlock victim if other sessions in the deadlock chain are running at a higher deadlock priority value, but will not be the deadlock victim if the other sessions are running at a deadlock priority value lower than the value of the current session. It also specifies that the current session is eligible to be the deadlock victim if another session is running with a deadlock priority value that is the same as the current session. LOW maps to -5, NORMAL to 0, and HIGH to 5.

@ deadlock_var

Is a character variable specifying the deadlock priority. The variable must be set to a value of 'LOW', 'NORMAL' or 'HIGH'. The variable must be large enough to hold the entire string.

@ deadlock_intvar

Is an integer variable specifying the deadlock priority. The variable must be set to an integer value in the range (-10 to 10).

Remarks:

Deadlocks arise when two sessions are both waiting for access to resources locked by the other. When an instance of SQL Server detects that two sessions are deadlocked, it resolves the deadlock by choosing one of the sessions as a deadlock victim. The current transaction of the victim is rolled back and deadlock error message 1205 is returned to the client. This releases all of the locks held by that session, allowing the other session to proceed.

Which session is chosen as the deadlock victim depends on each session's deadlock priority:

·         If both sessions have the same deadlock priority, the instance of SQL Server chooses the session that is less expensive to roll back as the deadlock victim. For example, if both sessions have set their deadlock priority to HIGH, the instance will choose as a victim the session it estimates is less costly to roll back.

·         If the sessions have different deadlock priorities, the session with the lowest deadlock priority is chosen as the deadlock victim.

SET DEADLOCK_PRIORITY is set at execute or run time and not at parse time.


Permission:

Require membership in the public role.

Examples:

The following example uses a variable to set the deadlock priority to LOW.

DECLARE @deadlock_var NCHAR(3);

SET @deadlock_var = N'LOW';

SET DEADLOCK_PRIORITY @deadlock_var;

GO

The following example sets the deadlock priority to NORMAL.

SET DEADLOCK_PRIORITY NORMAL;

GO

Detecting and Ending Deadlocks

 A good link  for detecting and ending deadlocks.

http://msdn.microsoft.com/en-us/library/ms178104(SQL.105).aspx.

Locking and Blocking Scripts in SQL Server 2000 vs SQL Server 2005

SQL Server 2000
In SQL Server 2000 the main stored procedure to find out which locks were issued was sp_lock. Typically this command was followed by sp_who2.In order to find out more information about the spid in terms of the user, host name, application, CPU and memory utilization either DBCC INPUTBUFFER or fn_get_sql was issued to find out exactly what code was being issued.If you ar eunable to find the required result then you might look into master.dbo.syslockinfo table and/or the master.dbo.sysprocesses table, although this was not always the recommended approach.


SQL Server 2000 - Locking Related Objects
ID
Object
Example
1
sp_lock - System stored procedure to identify all of the locks issued across the SQL Server instance
EXEC master.dbo.sp_lock
GO
2
sp_who and sp_who2 - System stored procedure to identify all of the processes across the SQL Server instance
EXEC master.dbo.sp_who2
GO
3
master.dbo.syslockinfo - System table with the locks issued across the SQL Server instance
SELECT req_spid AS 'spid',
DB_NAME(rsc_dbid) AS 'Database',
OBJECT_NAME(rsc_objid) AS 'Name',
rsc_indid AS 'Index',
rsc_text AS 'Description',
ResourceType = CASE WHEN rsc_type = 1 THEN 'NULL Resource'
WHEN rsc_type = 2 THEN 'Database'
WHEN rsc_type = 3 THEN 'File'
WHEN rsc_type = 4 THEN 'Index'
WHEN rsc_type = 5 THEN 'Table'
WHEN rsc_type = 6 THEN 'Page'
WHEN rsc_type = 7 THEN 'Key'
WHEN rsc_type = 8 THEN 'Extent'
WHEN rsc_type = 9 THEN 'RID (Row ID)'
WHEN rsc_type = 10 THEN 'Application'
ELSE 'Unknown'
END,
Status = CASE WHEN req_status = 1 THEN 'Granted'
WHEN req_status = 2 THEN 'Converting'
WHEN req_status = 3 THEN 'Waiting'
ELSE 'Unknown'
END,
OwnerType =
CASE WHEN req_ownertype = 1 THEN 'Transaction'
WHEN req_ownertype = 2 THEN 'Cursor'
WHEN req_ownertype = 3 THEN 'Session'
WHEN req_ownertype = 4 THEN 'ExSession'
ELSE 'Unknown'
END,
LockRequestMode =
CASE WHEN req_mode = 0 THEN 'No access '
WHEN req_mode = 1 THEN 'Sch-S (Schema stability)'
WHEN req_mode = 2 THEN 'Sch-M (Schema modification)'
WHEN req_mode = 3 THEN 'S (Shared)'
WHEN req_mode = 4 THEN 'U (Update)'
WHEN req_mode = 5 THEN 'X (Exclusive)'
WHEN req_mode = 6 THEN 'IS (Intent Shared)'
WHEN req_mode = 7 THEN 'IU (Intent Update)'
WHEN req_mode = 8 THEN 'IX (Intent Exclusive)'
WHEN req_mode = 9 THEN 'SIU (Shared Intent Update)'
WHEN req_mode = 10 THEN 'SIX (Shared Intent Exclusive)'
WHEN req_mode = 11 THEN 'UIX (Update Intent Exclusive)'
WHEN req_mode = 12 THEN 'BU. (Bulk operations)'
WHEN req_mode = 13 THEN 'RangeS_S'
WHEN req_mode = 14 THEN 'RangeS_U'
WHEN req_mode = 15 THEN 'RangeI_N'
WHEN req_mode = 16 THEN 'RangeI_S'
WHEN req_mode = 17 THEN 'RangeI_U'
WHEN req_mode = 18 THEN 'RangeI_X'
WHEN req_mode = 19 THEN 'RangeX_S'
WHEN req_mode = 20 THEN 'RangeX_U'
WHEN req_mode = 21 THEN 'RangeX_X'
ELSE 'Unknown'
END
FROM master.dbo.syslockinfo
GO
4
master.dbo.sysprocesses - System table with the process information across the SQL Server instance
SELECT *
FROM master.dbo.sysprocesses
GO


SQL Server 2005
In SQL Server 2005, these objects remain available but some are scheduled to be deprecated in SQL Server 2008 which means now is the time to make sure you transition your scripts prior to the SQL Server 2008 migration:
  • sp_lock - For backward compatibility only and expected to be deprecated in SQL Server 2008
    • Replacement (SQL Server 2005) = sys.dm_tran_locks
    • Expected Replacement (SQL Server 2008) = sys.syslock_information
  • sp_who and sp_who2 - Not expected to be deprecated in SQL Server 2008
  • master.dbo.syslockinfo - For backward compatibility only and expected to be deprecated in SQL Server 2008
    • Replacement (SQL Server 2005) = sys.dm_tran_locks
    • Expected Replacement (SQL Server 2008) = sys.syslock_information
  • master.dbo.sysprocesses - For backward compatibility only and expected to be deprecated in SQL Server 2008
    • Replacement (SQL Server 2005) = sys.dm_exec_connections, sys.dm_exec_sessions, sys.dm_exec_requests
      • Stay tuned for an upcoming tip on the mapping and opportunities with these three DMVs
With the sys.dm_tran_locks DMV in SQL Server 2005 functionally replacing sp_lock and master.dbo.syslockinfo a simple query can be issued to capture the pertinent locking related information. The resource related information (ResourceSubType, ResourceType, Request_Owner_Type, etc.) has all be provided as a descriptive name as opposed to having to write case statements to decipher the values. As such, this simplifies the overall querying as well as provides the opportunity to query supported objects and issue COUNT commands, determine specific lock types, etc.


SQL Server 2005 - master.sys.dm_tran_locks
-- Simple query to return all records and all columns
SELECT *
FROM master.sys.dm_tran_locks;
GO
-- Focused result set
SELECT resource_type, request_session_id, resource_database_id, resource_associated_entity_id, resource_subtype, resource_description, request_status, request_owner_type, request_mode
FROM sys.dm_tran_locks;
GO
-- Number of lock records per database
SELECT COUNT(*) AS 'NumberofLockRecords', DB_NAME(resource_database_id)
FROM master.sys.dm_tran_locks
GROUP BY resource_database_id;
GO
-- Query for specific lock types
SELECT resource_type, request_session_id, resource_database_id, resource_associated_entity_id, resource_subtype, resource_description, request_status, request_owner_type, request_mode
FROM sys.dm_tran_locks
WHERE resource_type IN ('PAGE', 'KEY', 'EXTENT', 'RID');
GO
SELECT tl.request_session_id, wt.blocking_session_id, DB_NAME(tl.resource_database_id) AS DatabaseName, tl.resource_type, tl.request_mode, tl.resource_associated_entity_id
FROM sys.dm_tran_locks as tl
INNER JOIN sys.dm_os_waiting_tasks as wt
ON tl.lock_owner_address = wt.resource_address;
GO


Different ways to find out the Blockings

There are number of ways to find out the details of the system processes IDs (spids) involved in blocking.

  • sp_who2 System Stored Procedure

  • sys.dm_exec_requests DMV

  • Sys.dm_os_waiting_tasks

  • SQL Server Management Studio Activity Monitor

  • SQL Server Management Studio Reports

  • SQL Server Profiler

  • Monday, June 11, 2012

    SQL Server script to rebuild all indexes for all tables and all databases

    DECLARE @Database VARCHAR(255)

    DECLARE @Table VARCHAR(255)

    DECLARE @cmd NVARCHAR(500)

    DECLARE @fillfactor INT

    SET @fillfactor = 90

    DECLARE DatabaseCursor CURSOR FOR

    SELECT name FROM MASTER.dbo.sysdatabases

    WHERE name NOT IN ('master','msdb','tempdb','model','distribution')

    ORDER BY 1

    OPEN DatabaseCursor

    FETCH NEXT FROM DatabaseCursor INTO @Database

    WHILE @@FETCH_STATUS = 0

    BEGIN

    SET @cmd = 'DECLARE TableCursor CURSOR FOR SELECT ''['' + table_catalog + ''].['' + table_schema + ''].['' +

    table_name + '']'' as tableName FROM ' + @Database + '.INFORMATION_SCHEMA.TABLES

    WHERE table_type = ''BASE TABLE'''

    -- create table cursor

    EXEC (@cmd)

    OPEN TableCursor

    FETCH NEXT FROM TableCursor INTO @Table

    WHILE @@FETCH_STATUS = 0

    BEGIN

    IF (@@MICROSOFTVERSION / POWER(2, 24) >= 9)

    BEGIN

    -- SQL 2005 or higher command

    SET @cmd = 'ALTER INDEX ALL ON ' + @Table + ' REBUILD WITH (FILLFACTOR = ' + CONVERT(VARCHAR(3),@fillfactor) + ')'

    EXEC (@cmd)

    END

    ELSE

    BEGIN

    -- SQL 2000 command

    DBCC DBREINDEX(@Table,' ',@fillfactor)

    END

    FETCH NEXT FROM TableCursor INTO @Table

    END

    CLOSE TableCursor

    DEALLOCATE TableCursor

    FETCH NEXT FROM DatabaseCursor INTO @Database

    END

    CLOSE DatabaseCursor

    DEALLOCATE DatabaseCursor